Key takeaways
- Centrifugal impellers move dense water rather than air; an air-filled casing becomes gas-bound and spins without pumping.
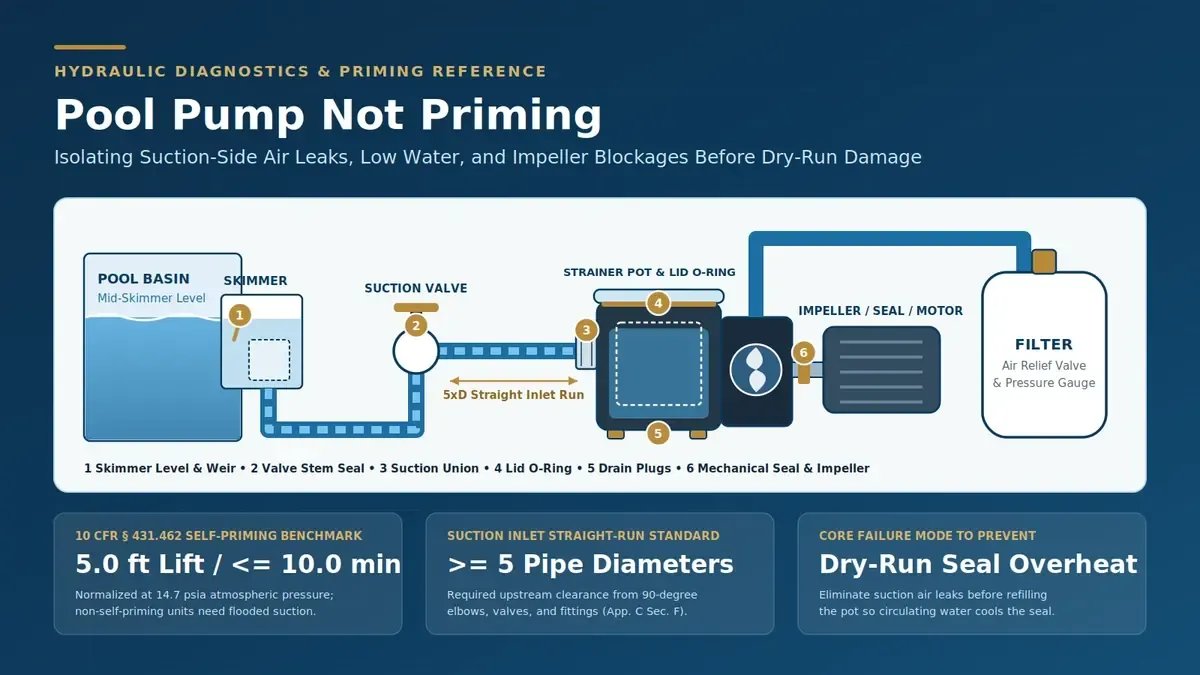
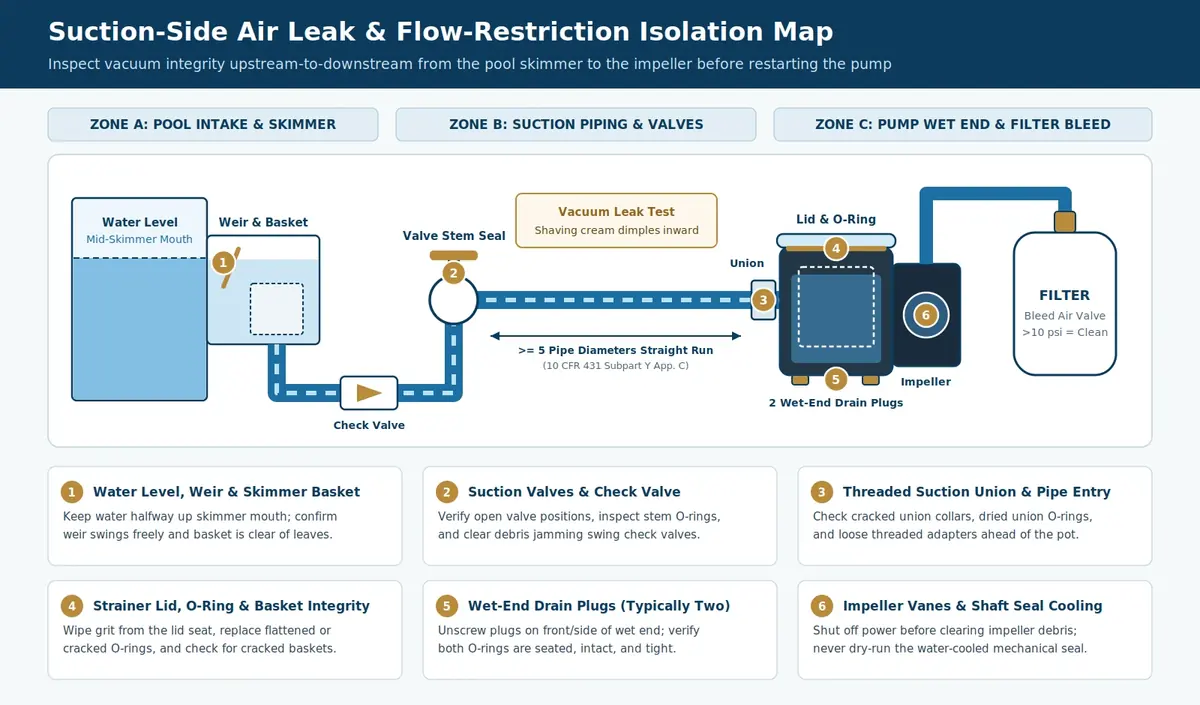
- Isolate leaks in sequence: mid-skimmer level and weir, baskets, suction valves, check valve, union, lid O-ring, and drain plugs.
- Federal pool pump definitions require self-priming pumps to be certified under NSF/ANSI 50-2015 or re-prime 5.0 feet within 10.0 minutes.
- Non-self-priming above-ground pumps cannot lift water 5.0 feet and must sit below the waterline for flooded suction.
When a pool pump will not prime, the cause is almost always air entering the suction side, pool water sitting too low in the skimmer, or debris blocking the skimmer basket, pump strainer basket, valves, or impeller. Isolating the vacuum leak in order before refilling the strainer pot restores full flow and prevents mechanical seal overheating.
Why is my pool pump running but not pumping water?
A running pool pump moves no water when air fills the casing instead of liquid, leaving the centrifugal impeller gas-bound and unable to build discharge pressure. Because centrifugal impellers accelerate dense liquid rather than air, a suction leak, closed valve, or debris-packed impeller lets the motor spin dry without circulating water.
Under standard centrifugal pump priming mechanics, every centrifugal pump requires liquid inside its casing to operate. Dry or low-flow operation overheats the wet end because an end-face mechanical shaft seal generates heat from rubbing and viscous shear and relies on circulating water for cooling. Pouring water into the pot offers only temporary relief until cracked unions, worn O-rings, or loose fittings are sealed.
Scroll horizontally to see all columns when the table extends beyond the screen.
How do you prime a pool water pump step by step?
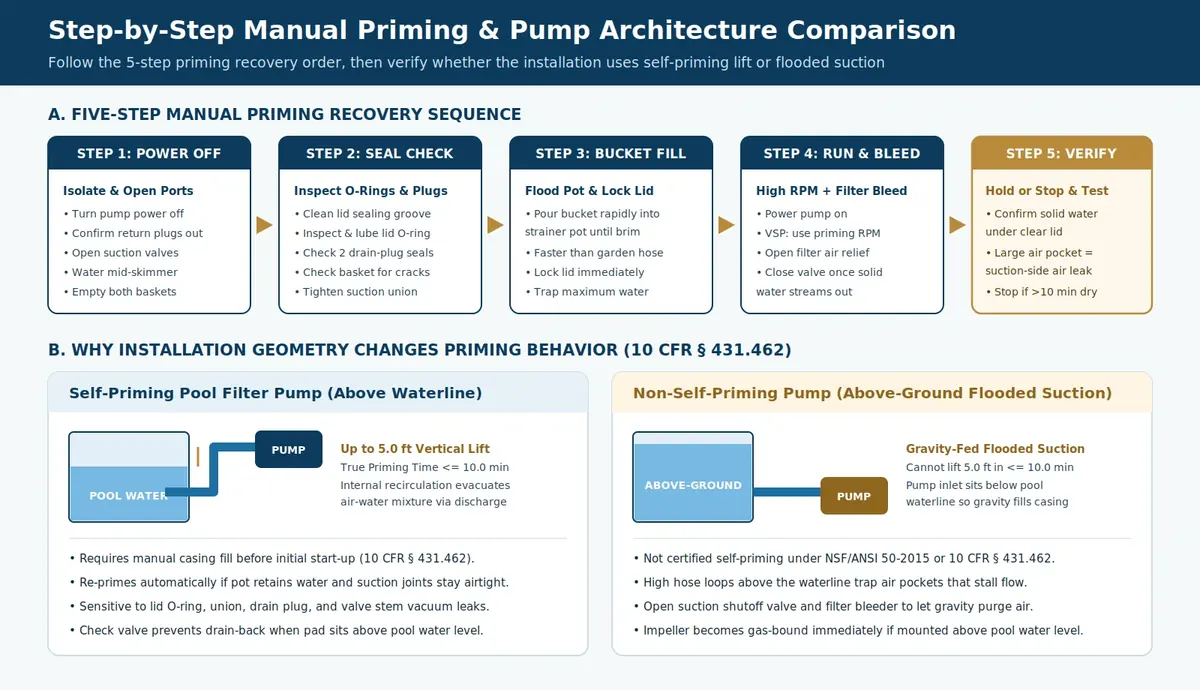
To prime a pool pump manually, shut off power, confirm suction valves are open and baskets are clear, inspect the lid and drain-plug O-rings, fill the strainer pot rapidly with a bucket until overflowing, lock the lid immediately, run priming speed, and open the filter air relief valve until solid water flows.
- Shut off power and verify open paths. Turn power off before opening the housing. Confirm return plugs are out, skimmer and main drain openings are clear, and all suction valves are open.
- Check water level and clean baskets. Keep pool water halfway up the skimmer mouth with a free-swinging weir gate, and empty both baskets per ENERGY STAR preventive maintenance guidance.
- Inspect lid and drain-plug O-rings. Clean grit from the lid seat and verify the lid O-ring is supple and uncracked. Check both wet-end drain plugs (typically two on the front or side) for intact O-rings.
- Flood the pot rapidly with a bucket. Dump water quickly from a bucket until the pot overflows; a bucket fills faster than a garden hose before water drains down the suction line.
- Lock the lid and run priming speed. Secure the lid immediately and start the pump. On variable-speed pumps, run a high enough RPM because low filtration speeds cannot pull a prime.
- Bleed filter air and verify timing. Open the filter air relief valve until steady water replaces sputtering air. Under the federal self-priming test method, a self-priming pump at a normalized 5.0-foot vertical lift (14.7 psia, 62.4 lb/ft3) must stabilize within 10.0 minutes. If it stays dry, shut off power to protect the shaft seal.
Why won’t the pool pump basket fill with water?
When the pump basket stays half-empty with a large pocket of air under the clear lid, air is leaking into the suction plumbing between the skimmer and the impeller - or a variable-speed pump is running too slowly to clear trapped air. Isolate each vacuum seal upstream to downstream before suspecting the motor.
Pump lid O-ring and wet-end drain plugs
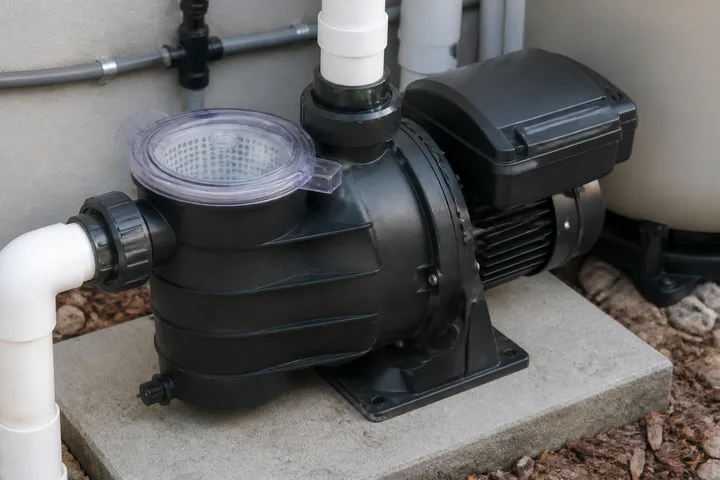
The strainer lid is opened most often and fails first. Without an intact lid O-ring, the pump pulls air under the cover instead of water from the pool. Wipe debris from the groove, inspect for flat spots or cracks, lubricate lightly, and tighten evenly. Below the pot, unscrew the two wet-end drain plugs counterclockwise and replace any missing or cracked plug O-ring.
Suction unions, valve stems, and inlet geometry
If the lid and drain plugs seal tightly, inspect the suction pipe entry union, suction valve stems, and all O-rings ahead of the impeller. Spray shaving cream over suspected joints while the pump runs: an active air leak draws the foam inward and leaves a dimple. In the federal priming test setup, the suction inlet sits at least 5 pipe diameters from 90-degree bends, valves, or fittings to prevent turbulence and trapped air.
Losing prime after shutdown
While suction-side leaks draw air during operation, a pressure-side leak on discharge piping or the filter lets air enter once the pump shuts off, draining the pot. A suction swing check valve prevents siphon drain-back at rest, but a debris-jammed check valve blocks incoming flow and stops priming until cleaned or replaced.
Why is the pool pump not pulling water from the skimmer?
A pump stops pulling water from the skimmer when pool water drops below mid-skimmer, a skimmer weir gate jams upright, debris packs the skimmer or pump basket, a suction valve stays closed, or a broken pump basket lets solids clog the impeller.
Maintain water halfway up the skimmer mouth so the intake draws solid water instead of gulping air. Federal priming rigs extend the suction riser at least 3 pipe diameters below water to prevent vortexing; a low waterline or upright stuck weir gate breaks that barrier immediately. Under federal pool pump definitions, a suction basket strainer blocks debris while passing 1 mm spherical solids. If the basket cracks, leaves or sand reach the impeller and kill discharge throw. Shut off electrical power before opening the cover to clear impeller debris. Rattling sounds indicate cavitation from undersized suction piping, leaks, low water, or blockages - see our pool pump sizing guide for suction sizing checks.
Why won’t my pool pump prime after cleaning?
A pool pump often refuses to prime right after cleaning because opening the lid, drain plugs, or filter breaks the water column and leaves a pinched lid O-ring, grit in the lid groove, a closed valve, or unbled filter air that prevents vacuum buildup on restart.
- Lid and plugs: Re-open the lid, wipe grit from the seat, verify the O-ring sits flat, and confirm both drain plugs are tight.
- Filter bleed and pressure: Open the filter air relief valve at restart. If the gauge reads more than 10 psi above clean baseline, restricted media slows circulation - track readings with our pool filter pressure baseline log.
- Valves and ports: Confirm suction valves returned from vacuum mode to open skimmer flow with no plugs left in the skimmer throat.
Can you prime a pool pump without removing the lid?
You can prime without removing the lid only if a self-priming pump still holds residual casing water with airtight suction joints, or if a below-waterline flooded-suction system lets gravity fill the pot when valves and the filter bleeder open.
Under federal dedicated-purpose pool pump definitions, a self-priming pump requires manual casing fill before initial start-up, then uses an internal recirculation passage to re-prime automatically by pumping a two-phase air-water mixture until atmospheric pressure pushes water into the intake. On variable-speed units, startup speed must stay high enough to clear air before dropping to daily schedules in our variable-speed pool pump flow rate guide. If the pot is completely dry, always bucket-fill manually first.
Why won’t an above-ground pool pump prime?
Most above-ground pool pumps fail to prime when suction hoses arch above the waterline or the pump sits too high, because above-ground filter pumps are typically non-self-priming units dependent on gravity-fed flooded suction below the water surface.
Scroll horizontally to see all columns when the table extends beyond the screen.
Per centrifugal pump installation principles, mounting a non-self-priming pump below the source prevents gas-binding. Keep hoses sloped without high air-trapping loops, open shutoff valves fully, and bleed air at the filter until gravity floods the pot.
Suction-side priming recovery checklist
Complete these checks from pool wall to filter before restarting a dry pump; browse related circulation guides in the pool equipment hub.
- Skimmer and water level: Confirm water sits halfway up the skimmer mouth and the weir swings freely; top off the pool or free a jammed weir before restarting.
- Baskets and suction valves: Verify clear skimmer and pump baskets (1 mm mesh intact) and open suction valves; empty leaves, replace any cracked basket, and open closed valves.
- Strainer lid and drain plugs: Inspect a supple, uncracked lid O-ring and confirm both wet-end drain plugs are sealed; clean the lid groove and lubricate or replace worn O-rings.
- Suction unions and valve stems: Confirm airtight joints and at least 5 pipe diameters of straight inlet run; if shaving cream dimples inward at a joint, reseat the union O-ring or rebuild the valve stem.
- Impeller and filter bleed: Shut off power to verify the impeller clears debris and keep filter pressure rise at or below 10 psi above baseline; bleed tank air or clean the filter when needed.
- Prime and verify: Confirm solid water under the clear strainer lid within 10.0 minutes; if a large air pocket remains or the pot runs dry, shut off the motor and recheck suction seals.
Frequently asked questions
Why does my pool pump lose prime after I turn it off?
When a pump stops and the pot drains back, air is entering through a worn lid O-ring, loose drain plugs, a suction fitting leak, or a pressure-side discharge leak. On elevated pads, a sticking or missing suction check valve can also let water siphon back to the pool.
How long should a self-priming pool pump take to prime?
Under the federal self-priming test method, a self-priming pool filter pump must reach steady discharge pressure or full flow within 10.0 minutes at a 5.0-foot vertical lift. If the basket stays full of air, shut off power and check for suction leaks.
How do I find a suction-side air leak on a pool pump?
Check the strainer lid O-ring, the two wet-end drain plugs, the threaded suction union, and suction valve stems. While running, spray shaving cream over suspected joints; vacuum suction pulls the foam inward and leaves a dimple.
Can a dirty filter stop a pool pump from priming?
Yes. High discharge backpressure slows water movement and air evacuation. When the filter gauge reads more than 10 psi above your clean baseline, clean or backwash the filter and bleed trapped air from the relief valve.
Sources
- Dedicated-Purpose Pool Pump Definitions — eCFR (U.S. DOE) Accessed November 21, 2026.
- Uniform Test Method for Dedicated-Purpose Pool Pumps (Appendix C) — eCFR (U.S. DOE) Accessed November 21, 2026.
- Pool Pumps Preventive Maintenance Guidance — ENERGY STAR (U.S. EPA) Accessed November 21, 2026.
- Centrifugal Pump Priming Mechanics — Wikipedia Accessed November 21, 2026.
- End-Face Mechanical Seal Cooling — Wikipedia Accessed November 21, 2026.